Showing posts with label Toddler Food. Show all posts
Tuesday, October 23, 2018

Super Veggie Sauce

Untitled

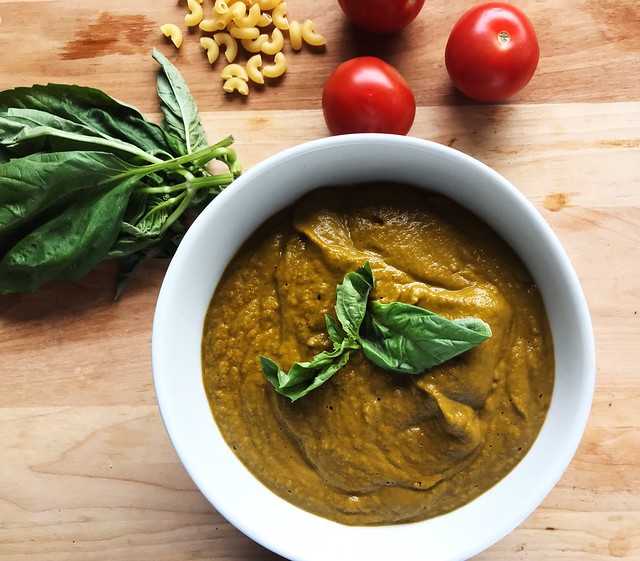
When I first introduced solid food to Molly, I was obsessed with getting enough vegetables into her diet. Along the way I discovered a recipe for a veggie sauce which was packed full of healthy foods. Over the years, Molly has stopped eating it but I crave it and have continued making it for myself. I realized that I've never shared this amazing sauce and am rectifying that today. I usually serve this with pasta but it is also tasty over chicken or in a lasagna dish instead of the traditional bolognese sauce. If making this for a toddler palate, I'd leave out the salt. Adults will need more salt. Also this sauce cook be mixed with a more traditional spaghetti sauce to "sneak" vegetables into your family's diet if you so desire. The sauce on its own isn't very red so mixing with a tomato sauce will give you a richer red color. And lastly, this sauce is can be easily adjusted to most vegetables.
Untitled

Super Veggie Sauce

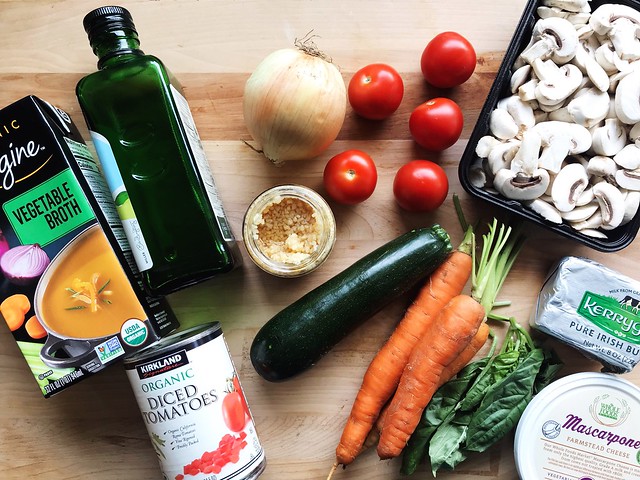
Ingredients

2 tbsp. olive oil
1 small yellow onion, chopped
1 clove garlic, chopped
2 small carrots, peeled and chopped
1 medium zucchini, chopped
3/4 cup chopped white mushrooms
3 plum tomatoes, chopped
1 tbsp. unsalted butter
1 (15-oz.) can diced tomatoes
1 bunch kale, chopped
1/2 cup vegetable (or chicken) stock
1 tbsp. torn fresh basil leaves
Freshly ground black pepper
salt, to taste
3-4 tbsp. mascarpone cheese (optional)

Directions
  1. Heat olive oil in a large saucepan over medium heat. Add onion and garlic, and saute for 3-4 minutes. Add carrots and saute for 5 minutes. Add zucchini and saute for an additional 2 minutes. Add the mushrooms  and kale. Saute for 2 more minutes. 
  2. Add in fresh tomatoes and butter. Simmer for 2 minutes. Pour in the can of tomatoes with about half of the juice along with vegetable stock and basil. Season with salt and pepper to taste. Cover and cook on medium heat for 10 more minutes. 
  3. Once the vegetables are all tender, puree in a blender until smooth. Stir in mascarpone cheese if desired for a slightly creamier sauce. 
Friday, September 20, 2013

Coconut Date Snack Balls

balls

Last time I was at Costco, I bought 2 lbs of dates. In my defense, they looked delicious and I was hungry! However, 2 lbs of dates is a lot of dates so I got to thinking about how best to use them. Molly loves, loves, loves food with dates in them. She goes especially nuts over Lara Bars and I've been planning to make some homemade Lara Bars but just haven't gotten around to it yet. 


Mixture

Today as I was staring at the 2 lbs box of dates, I looked around and saw that I also had some walnuts, chia seeds, flax seeds and coconut which all work together for a delicious snack. I was also reminded of the Apple Oat bars I made for Molly earlier this month and so I got to mixing. 


pre coconut

The best part of this recipe is that it requires no cooking, just some food processing and sticky ball rolling. The second best part of this recipe is that Molly kept asking for MORE when I gave her one. She had three before I stopped her and gave her some water. 

Coconut Date Snack Balls

by Rebecca Mongrain
Prep Time: 10 minutes
Ingredients (70 balls)
  • 2 lbs Madjool dates, pitted
  • 1 cup shelled walnuts
  • 1/4 cup ground chia seeds
  • 1/4 cup ground flax seeds
  • 1-7 oz bag of coconut flakes
Instructions
1. Puree the dates, walnuts, chia seeds and flax seeds in a food processor until smooth. The mixture will begin to form a giant ball.
2. Take 1 Tablespoon of the date mixture and roll into a ball. This is super sticky!
3. Spread the coconut flakes on a plate and roll the date balls in the flakes.
4. Serve to your favorite munchkin and watch them ask over and over for more.
5. Store in the fridge for up to 3 weeks or covered on the counter for up to one week.
Powered by Recipage


Enjoy

Monday, June 24, 2013

Toddler Eating On-The-Go!

Molly and I like to get out and explore. We visit the zoo, we go to the park, we have play dates at friend's houses. A lot of times these adventures mean that we are away from the house for lunch. I like to pack food for us as I don't like to spend a lot of money eating out everyday and to be honest, the items on most kid's menus are not to my liking. I mean how many chicken fingers, mac-n-cheese and fries lunches should one kid have in a week. I also like that I have food ready to go when Molly is hungry. There is no looking for a place to eat or waiting for food to be ready. We can be munching on lunch within minutes.

Of course, packing a toddler's lunch means that I have a honed a small collection of containers that I think are perfect for packing and eating lunch on the go.

IMG_6537

I pack a lot of snacks in our Innobaby Smart Storage System. It's got a little handle which makes carrying super easy. Each of the tiers comes apart and can be used separately or together. The great thing about this item is that I was able to use it when Molly was still on formula but now I use it for snacks. I pack cheerios, grapes, cheese, blueberries, etc in it.

 IMG_6540

Molly likes to take her milk on the road so we put that in our Thermos Foogo Leak-proof straw cup. It keeps her milk nice and cold. It also doesn't leak as much as other cups we've used.

 IMG_6538

I also love the green sprouts sproutware snack cups for bigger food items. They hold about 4 oz of food and are perfect for pasta, peas, beans and other treats. We used these a lot when Molly first started on purees. I would put the frozen cube of food into them the night before and then she would eat the defrosted cube for meals the next day. Now we use them for leftovers and lunches.

IMG_6541

For snacks on the go, we rely on our Munchkin Snack Catcher which is awesome for cut-up fruit, crackers, dried fruit and cheerios.

I usually put all of the lunch food into my old Medela pump cooler with a reusable ice pack. It's the perfect size for a toddler lunch and even leaves some room for my food. There are some super cute lunch bags out there though and when Molly heads off to preschool, I'll be packing her lunch in those.
Friday, May 17, 2013

Kale Basil Pesto

Pesto Ingredients

We recently visited some friends in Canada. The wife is a fantastic cook and always has great ideas for getting more super foods into our diets. She made dinner for us one night and made a special meal for Molly and her son. It looked simple enough, some pasta with some pesto sauce on it. 

Pesto

Molly inhaled it and tried to eat all of her friend's food too. I asked my friend what she had put into it because I was sooooo making this when we got home. She said that she buys pesto at the store and adds some kale and walnuts to it before freezing it in small batches. 

Garlic

I pondered this recipe for the rest of the week, we were on vacation. One of my former co-workers used to make HUGE batches of pesto every summer and then give out jars at Christmas. These were coveted jars of pesto. My parents used to steal my jar if they saw it in my fridge. The pesto is that good. 

Pesto for Freezing

 When we got home, I poured through my email and found her recipe. I knew that I wanted to change it though so I could add in the kale and walnuts. I made a few other tweaks to the recipe and I have to say that it is GOOOOD! Molly and I enjoyed the pesto in our eggs this morning and I can't wait to have some fresh pasta with pesto for dinner. 

Frozen Pesto

I was thrown back a bit to Molly's puree days as I froze the pesto in thTovolo Perfect Cube Silicone Ice Cube Trays. I forgot how useful these trays can be though. I think I'll be using them to freeze fresh herbs from my herb garden, chicken broth, concentrated syrups, etc.  

Whirled Pesto


Kale Basil Pesto
makes 4 cups

Ingredients

6 cloves of garlic, peeled
4 cups packed fresh basil
1/4 cup parsley
2 cups steamed Kale
2 cups Parmigiano-Reggiano, grated
1 cup toasted pine nuts
1 cup walnuts
3/4 teaspoon kosher salt
2 cups olive oil (more or less)

Directions
1. Toss the garlic into your food processor and pulse it for a few seconds. 
2. Add the basil, parley, kale, cheese, pine nuts, walnuts and salt to the garlic and pulse the food processor again. 
3. Slowly add your olive oil through the spout until the pesto is smooth. Scrape down the sides and run again for about 15 seconds. 
4. You can either spoon your pesto into clean canning jars or into ice cube trays to freeze. I bought out my silicon ice cube trays from when I made Molly's baby food and used those. I spooned the pesto into the trays and then thumped them on the counter to level them out. Then I wrapped them in foil overnight. Once the pesto was frozen, I took the cubes out of the trays and put them into ziplock bags. Now I have 1 ounce cubes of pesto ready for pasta, chicken, pizza or eggs! 

Back in the Freezer

Friday, April 26, 2013

Butternut Squash Mac & Cheese Bites

butternut

I have an unabashed love for macaroni and cheese, especially the kind that comes in a box. Yes, the kind with the powdered cheese and all. However as I've aged (not so gracefully), I've come to really love homemade macaroni and cheese. Molly also has a deep love for pasta and cheese, as do most toddlers so I decided it would be tasty to make some macaroni and cheese. However because I'm now a Mother, I felt that I needed to add some nutrition. One of the other Moms at the pool told me that she adds roasted butternut squash to her kids pasta. Delicious! 

bites

This recipe makes a fair amount so I decided to spread the love by making it into mini bites. I think this would be fantastic as a party food or just you know as lunch. The other great thing about this dish is how freezable it is. Make a big batch (double it if you'd like) and freeze for a rainy day. I love doing this because I honestly do not feel like cooking everyday but I always want homemade food. This way I get the best of both worlds as does Molly. 

macandcheesebites

Butternut Squash Mac & Cheese Bites
Makes 24 mini bites

Ingredients

  • 2 Tablespoons unsalted butter
  • 3 Tablespoons flour
  • 2 cups warmed milk
  • 1 cup shredded cheddar cheese
  • 1/2 cup monterey jack cheese
  • salt and pepper
  • pinch of freshly ground nutmeg
  • pinch of cayenne pepper
  • 1 cup roasted butternut squash, mashed 
  • 2 cups uncooked macaroni 

Directions

1. Cook the macaroni in boiling water for approx. 10 minutes or al dente. Drain and set aside.
2. Melt the butter in a thick bottomed pan over medium-high heat. Slowly whisk in the flour and cook until the roux is frothy and pale. This should take about a minute. 
3. Slowly add the warmed milk to the roux and whisk until thickened, approximately 3 minutes. Reduce the heat to low and add the salt, pepper, nutmeg and cayenne pepper. Stir until thick. 
4. Whisk in the cheddar cheese and monterey jack cheese until melted. Slowly add the roasted butternut squash and stir until combined. 
5. Add the cooked macaroni to the cheese mixture and combine. 
6. Place a tablespoon or two of the macaroni mixture into each mini muffin tin. 
7. Bake for 18 minutes at 400 F. 
8. Cool in the muffin cups, remove and serve. 

butternutmacandcheese
Friday, April 12, 2013

Toddler Veggie Muffins

Veggies Muffin

Molly now eats a lot of the same meals I do but I still like to have some toddler food staples on hand. Sometimes I mis-judge when Molly is going to be hungry and lunch is in no way ready for consumption. It is at times like these that I like to pull out a mini muffin or another sort of toddler snack. 

IMG_4576

I created this recipe while trying to figure out how to stuff these small muffins full of good eats. These muffins are packed full of fruit and veggies. They are super delicious and I may have snuck one or two myself. 

IMG_4575

As with almost all of my recipes, I believe these can be adjusted for the kinds of fruits and veggies you have on hand. Instead of shredded carrots, try shredded zucchini (make sure to drain all the liquid before hand). Instead of broccoli puree, maybe spinach puree! 


IMG_4585


The best part may be that Molly really enjoys these muffins. She doesn't know that they are full of good stuff. She just knows that they are, in her words, yum-yum. 

Veggie Muffins

Toddler Veggie Muffins
makes 36 mini muffins or 20 regular muffins

Ingredients
1 1/2 cup flour
1 cup old-fashioned oats
3/4 teaspoon baking soda
1/2 teaspoon salt
1/2 cup sugar
1/2 cup unsweetened applesauce
1/4 cup unsalted butter
2 eggs
1/4 cup prune/apple juice (or water)
1 1/2 cups broccoli
1 1/2 cups banana, smashed
3/4 cup grated carrots
1/4 cup yogurt
1/2 teaspoon vanilla

Directions

  1. Preheat oven to 350F and grease your mini muffin tin. 
  2. Whisk together flour, oats, baking soda, salt together. Set aside.
  3. Cream together sugar, applesauce and butter until smooth. Add eggs, one at a time and beat until creamy and smooth. 
  4. In a food processor, place broccoli and prune juice (or water) and puree together. You need about a 1/2 cup of broccoli puree. 
  5. To the sugar mixture, add the broccoli puree, smashed bananas, carrots, yogurt and vanilla. 
  6. Slowly fold in the flour mixture until just combined. 
  7. Spoon batter into a greased mini muffin tin by the Tablespoon. 
  8. Bake for 15-18 minutes until just golden brown. Allow to cool before serving. 
  9. Muffins can be frozen for up to 2 months. 
Veggie Muffin
 
Rebecca Mongrain's Blog © 2013.

Design by The Blog Boat